
What is Selenium IDE?
Selenium Integrated Development Environment (IDE) is a Firefox plugin which makes the testers’ life easier. It was developed by Shinya Kasatani and became a part of Selenium family (IDE, RC, WebDriver, and Grid) in 2006.
In a simple way, you can record your actions in a browser and then export them as a reusable script in many programming languages (C#, Java, Python, Ruby). The magic lies in record & playback feature. Selenium IDE GUI makes it very easy to learn and use with the minimal knowledge of HTML and DOM.
Installing a browser and add-on
First of all, go to Firefox homepage and download the latest version of the browser. If you already have it – you’ve just earned a few minutes.
After successful installation, click “Open Menu” in the upper right of the browser. You will see some options, but now the one you should choose is “Add-ons”. Find the search input and type “Selenium IDE”. Now, install the add-on and restart your browser.
Start your engines
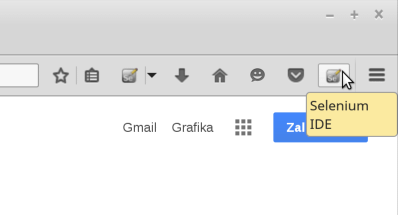
To start the Selenium IDE, you can click ALT+T and search for the right add-on. You can also click the newly created icon next to the “Open Menu”.
Now we are ready to begin with the fun stuff.
Know your IDE
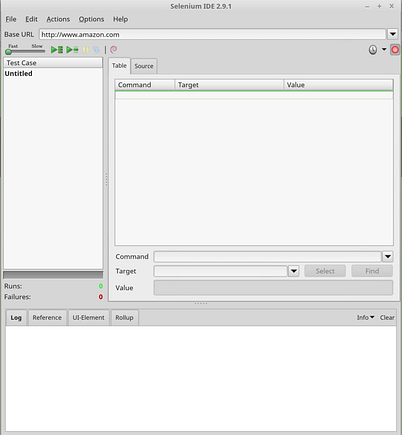
Let’s briefly explain what is what. Above, you can see the field called “Base URL”. Here you type the URL you will be testing. Consider a situation when you would like to test login on Appoint.ly. It’s the streamline scheduling platform we’ve been working on recently. For example, your “Base URL” will be appoint.ly. Then as the first command type open and for the target type /login.
COMMAND | TARGET | VALUE
open | /login | leave empty
Selenium IDE will append your target to your base URL and create an absolute URL appoint.ly/login .
Going further, below the base URL input, you can see the toolbar with all the tools to perform tests. Here you’ve got the list of Selenium IDE commands:

Speed control: you can set the speed of performed tests,
Run all: runs all the tests specified in the test suite,
Run: runs only the currently chosen test scenario,
Pause/Resume: freeze or resume the running test case,
Step: it allows you to go manually through all the steps in a test case – one at a time,
Apply Rollup Rules: the feature which allows grouping some repetitive actions into one action. For example, a process of logging into the application,
Record: when it’s on, it allows you to record all the actions you perform in a browser. It is a good starting point for any test which you can further modify. After the IDE is started, it is in the “Record” mode as default. You can turn it off by clicking it.
Just do it!
So now, when you geared-up, let’s write some tests.
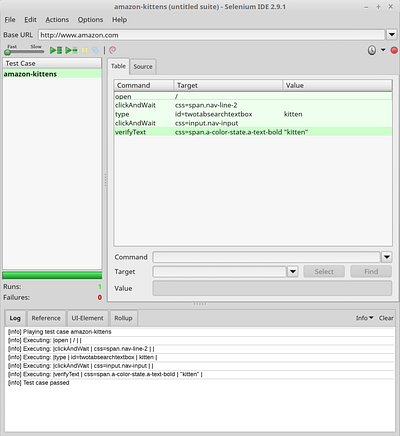
For the first test, consider a scenario like this:
- User navigates to amazon.com,
- User navigates to the list of all departments,
- User types some text in the search input and hits the Enter button,
- User presses backspace on the keyboard to go back.
First of all, you can press the “Record” button. Feel free to experiment and observe the recorded actions. After recording your test, press “Run” to start your test.
Let’s move on. If you recorded your action as specified above, we will change some things.
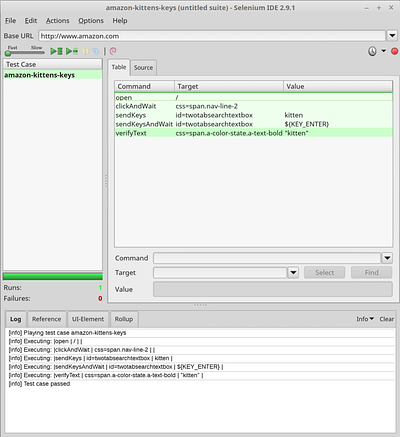
First, we need to create an action for pressing a button on the keyboard. To make that happen, we can use the command sendKeysAndWait. It is useful in situations such as autocompleting the inputs. This command simulates keystrokes events on specified elements.
It takes two arguments:
- locator – an element locator,
- value – value to type.
In our case, we want to “press” ENTER rather than click on the search button. To do that, we need to create an action:
COMMAND | TARGET | VALUE
sendKeysAndWait | id=twotabsearchtextbox | ${KEY_ENTER}.
After this modifications your code should look like the one below:
For more information about ASCII codes and the full list of key simulation codes, visit www.theasciicode.com.ar.
Dig deeper
Or, let’s say that we want to complicate our test and get familiar with more cool stuff.
We will use a command storeValue to store the value which we will type into search input. StoreValue takes the value of the locator and stores it in a variable defined in the “Value” input. Our variable and any other created will be stored in the associative array. This array contains all the variables declared in your test case and it’s called storedVars. If you want to access or manipulate the variable, you need to refer to it as storedVars[‘nameOfYourVariable’]. In our case:
COMMAND | TARGET | VALUE
storeValue | id=twotabsearchtextbox | inputValue.
Now, as we have some values stored, we should make use of them. So let’s check if the value typed in is equal to the value which can be seen next to the number of findings.
To do this, we can use the storeEval command. As you will see, there is a possibility to use Javascript inside the tests! In our case, we compare two variables and check if they are equal.
COMMAND | TARGET | VALUE
storeEval | javascript{storedVars[‘inputValue’]==storedVars[‘valueExpected’]} | .
Take a look at the image below to see the storing variables as well as the positive output of the test.
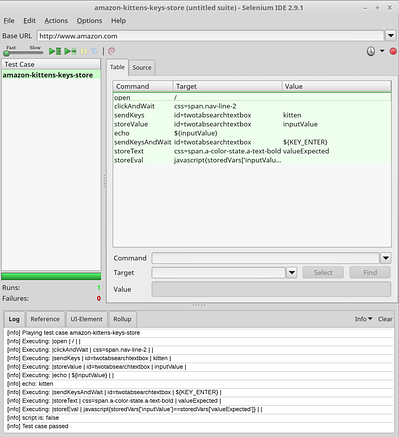
And… that’s it. Your first test is completed and successfully passed.
Of course, Selenium IDE has many limitations but in most cases, it is the best tool to create regression tests quickly and save some time – as well as money.
Why should you use Selenium IDE?
- It is very easy to use and install,
- It is flexible for the users,
- No Programming language experience is required for Selenium IDE, although some knowledge of HTML and DOM are needed,
- Selenium IDE provides Logging capabilities using file login plug-in,
- Recorded tests cases can be played as the test suite,
- It supports recording and playback options,
- It provides good support for the extensions,
- You can create your own scripts in Javascript and import them as extensions,
- You can convert a recorded script into any programming language like Java, C#, Perl etc.,
- It has a built-in help and test results reporting module,
- It allows you to set breakpoints, insert commands and comments wherever it is necessary,
- You can export test cases to formats used in Selenium RC and WebDriver,
- You can debug and set breakpoints.
Why shouldn’t you use Selenium IDE?
As a Firefox plug-in, it doesn’t support any browser other than Mozilla Firefox,
- It’s unable to generate detailed reports,
- External test-data cannot be taken into the current execution script,
- Selenium IDE doesn’t support test script grouping, database testing, and error handling,
- There is no flexibility in custom test case execution,
- It doesn’t explicitly provide help to support alerts, pop-ups, and navigations,
- It has no option to verify the images,
- It will not support listeners, loops, iteration, conditional statement and data-driven testing,
- Test execution is slow compared to what Selenium RC and WebDriver offer.
Read also: Introduction to Java REST API Testing
Selenium IDE vs. Selenium RC vs. Selenium WebDriver
The cons of Selenium IDE listed above are in fact only limitations, not obvious disadvantages. Those limitations can be overcome by using Selenium RC or WebDriver. Use them if you want to create your tests in a more advanced way, make them faster and more precise. Because of its simplicity, Selenium IDE should only be used as a prototyping tool.
To conclude, Selenium IDE is a great tool to start testing your application but if you want to go in a more complex and advanced way, then you should take Selenium RC or Selenium WebDriver into consideration. As it will be a subject of the next week’s article – stay tuned!
Read also: Single-page application vs. multiple-page application